Flat Lens Installation
I have used this same type of mount in my R2 dome where parts need to be installed, but may also need removal at some future time for repair or upgrade.
I began by assembling the parts I would need for the CENTER mounting point. The sides may be secured with industrial velcro just to hold them down. This center point ensures that the velcro does not bear the responsibility for holding it in, just for holding it in place.
The parts I am using are:
A 1/4" T-nut, some spacers that will fit around the shaft of the T-nut, a 1/4" machined bolt to fit the T-nut and a washer that will not allow the machined bolt to pass through - all found in Lowe's for only a couple of dollars, in the Hardware section in the metal specialty parts drawers near the nuts and bolts and key making area.
I glued two of the spacers together to achieve the height needed . . . superglue works great.

Here we see the beginning assembly order of how things will stack up once the T-nut is glued inside the frontal lobe of the helmet. These photos just show you the order of things, the T-nut must first be glued inside the helmet in the center of the two eyepieces, against the dome. Photos of this location coming soon.
The spacers seat around the T-nut shaft and will hold the lens material out from the bucket dome (because the eye openings of the bucket stick out - the T-nut mounts back against the inner dome and needs to rise up to the proper level for the lens to mount flat against the eye openings).
The machine bolt passes through the washer, and you are ready then to put the machined bolt and washer through the material used for your lens. This will then ALL be put inside the helmet and the machine bolt will screw down into the T-nut, snugly securing the center of the lens material to the helmet.
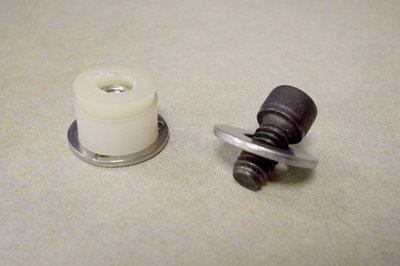
This is the stacking order minus the lens, I have not yet shot that picture. I will insert it as soon as I do. The lense will rest above the spacers and below the washer, held firmly in place as you tighten the machine bolt.
Here are the green lenses. I took the grinder's safety mask and cut it with scissors to the shape of a paper template I made of the lens openings in my helmet.

The lenses can be found here:
http://www.rjsafety.com/EH21.html
The lens you want is:
HF4118-DRK Dark Green Faceshield - $3.65 Standard View Window, Proportionate, .060" thickness, 8x 11 1/4"
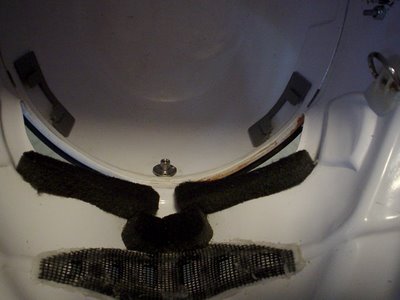
Here is the spot where the T-Nut should be cemented in:
Once that was done, I figured this would be a good time to paint the inside of my helmet, as I never did so when building it. I masked off the eye lens openings, removed the lower trim, and masked around the edge of the opening.

 Then I primed the inside and followed with several coats of Ultra Flat Black.

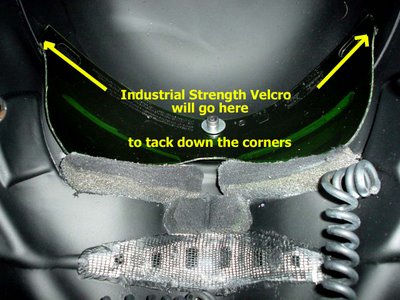
Having done that, and allowing it to dry overnight, I installed the lens as shown here:
 And here is what the installation looks like:
 The final step will be to add industrial strength velcro to the very edges of the lens to hold it snugly in place, and prevent anyone from seeing in past it into the bucket.
posted by Shadow Walker at 6:46 AM
![]()


0 Comments:
Post a Comment
<< Home